Tips for Building Cross-platform Flutter Apps
A look at the tips and tools we use to structure our cross-platform apps with Flutter.

At Pollyn, we use Flutter to build our app across five platforms from a single code base. This approach has worked really well for us so far and we’ve been able to achieve a high level of code reuse by sharing business logic and widgets across desktop, mobile and native applications.
Over time we have iterated on the tools and patterns we have used to share code across platforms and in this post we will be sharing some of our top tips and learnings.
Tip 1: Composition over customization
Certain parts of a codebase are easier to share across platforms than others. Business logic, for example, is highly shareable and often does not need to be changed at all. Screen-level widgets, on the other hand, can have very different user experiences across mobile platforms like iOS and desktop platforms like your browser.
Here is what the screen for collecting a referral looks like from our mobile app:
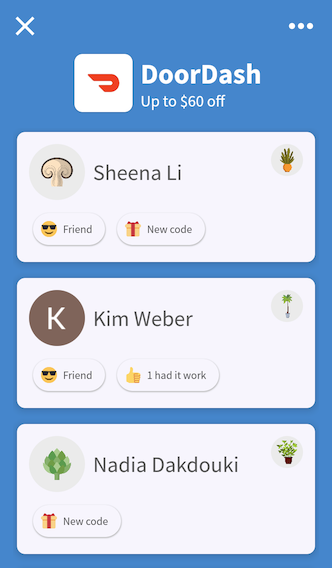
On a smaller form factor like mobile, we only present the list of referrals a user can pick from and move the rest of the information and actions a user can take to the corner menu. Let’s now compare this to how it looks on desktop:
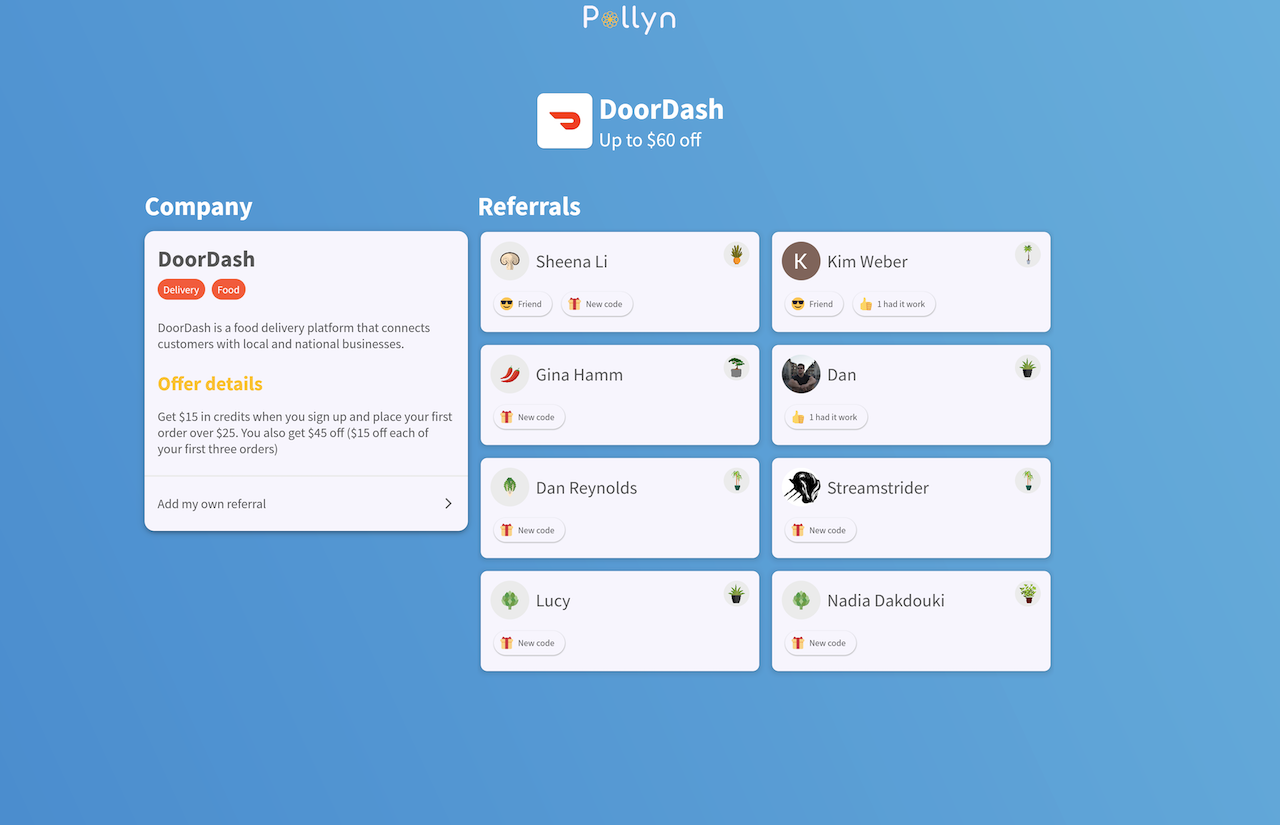
With the additional space available on desktop, we can show items in a grid instead of a list and all the company information and actions can be shown alongside them.
If we were to try and customize this screen to support all platforms, we would end up having a lot of branching conditionals in our code such as showing and hiding the menu, switching between lists and grids and displaying the company information.
If a screen needs a lot of customization to support the user experience for multiple platforms, don’t be afraid to break it out into a separate widget for each of them. Instead of looking for code reuse at the screen-level focus on the composable elements of the screen, the buttons, cards and lists that are common across platforms.
In this example, we have a separate MobileCollectReferral and DesktopCollectReferral screen and have the following shared widgets that they each use:
ReferralCardForUser- The card widget for each user’s referral.ReferralHeader- The header widget that displays the company logo and name.LoadingIndicator- The loader a user sees as they scroll down the list/grid.ActionRow- The cell a user can press to perform actions like adding their own referral for this company.
We can then also share the business logic for the screen such as:
- Fetching and lazy loading the list of referrals to be displayed on the screen.
- Determining if the user is logged in and able to add their own referrals.
- Deciding what should happen when a referral is pressed.
Once we have broken the screen into its core UI elements and separated out its business logic, building a different version of it per platform ends up being a lightweight process with minimal code duplication.
Platforms don’t always require separate screens. If two platforms can share a screen without making it brittle, then go ahead and share it! We reuse many screens between Android and iOS for example. It’s up to you where you want to draw that line. If you’re looking for a good rule of thumb, consider something like refactoring to multiple screens once you’ve introduced more than two platform checks.
Tip 2: Share Business logic with BLoCs
In the example we went through above, our collect referral screen is structured like this:
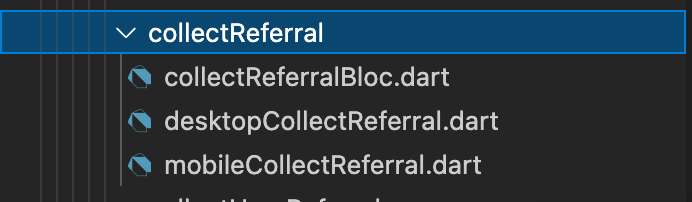
We break each platform’s version of the screen into its own file prefixed by platform name and colocate a BLoC to hold the shared business logic. BLoC stands for Business Logic Component and it’s a common pattern in the Flutter community introduced by Google engineers for separating out business logic from the presentation layer in order to achieve greater separation of responsibilities and testability.
While the Google blog post on it is a great deep dive into creating BLoCs with Reactive programming patterns and tools like StreamController, at its core it’s really just a class that you can use in your presentation layer to get the data you need and perform actions, whether that’s through streams, futures or whatever way you access and change your data.
In our case, one of the responsibilities of the CollectReferralBloc is to setup the stream of referrals for the screen:
import 'package:pollyn/src/blocs/batchBlocs/collectReferralsBatchManagerBloc.dart';

class CollectReferralBloc {
  late CollectReferralBatchManagerBloc _collectReferralResultBatchManager;
  late Stream<List<CollectReferralResultModel>> collectReferralResultBatchStream;

  CollectReferralBloc({
    required String referralId,
    required String userId,
    this.batchSize = 5,
  }) {
    _collectReferralResultBatchManager = CollectReferralBatchManagerBloc(
      referralId: referralId,
      userId: userId,
      batchSize: batchSize,
    );

    collectReferralResultBatchStream =
      _collectReferralResultBatchManager.stream;
  }
}
Screens can then create an instance of the CollectReferralBloc and subscribe to the stream of referrals to be displayed in the list of results. As a user scrolls down the screen, they can ask the bloc for more data and receive additional items from the stream.
Tip 3: Colocate platform implementations
While many shared widgets might not require any customization across platforms, some might want to be changed for padding, font size or other small tweaks. Putting all of those conditionals in the widget itself can make our code harder to read and more brittle, so we can use a similar folder structure like we did with screens to colocate platform specific implementations for our core UI elements. Here is the folder structure for the ReferralCardForUser widget from our earlier example:

The BaseReferralCardForUser widget defines the core implementation. We then make a separate MobileReferralCardForUser and DesktopReferralCardForUser files that customize the widget the the platform specification:
import 'package:flutter/material.dart';
import 'package:pollyn/src/widgets/shared/ReferralCardForUser/BaseReferralCardForUser.dart';

class MobileReferralCardForUser extends StatelessWidget {
  final String referralId;
  final String userId;

  MobileReferralCardForUser({
    required this.referralId,
    required this.userId,
  });

  @override
  build(context) {
    return BaseReferralCardForUser(
      padding: EdgeInsets.symmetric(vertical: 8, horizontal: 6),
      avatarSize: 24,
      referralId: referralId,
      userId: userId,
    );
  }
}
Platform specific screens can then import the version of the widget that they need and we have been able to reuse all of our shared code.
One issue we can run into with this approach, however, is that we may not always be using the widget from a platform specific screen. If we want to use the ReferralCardForUser widget in another shared widget, we wouldn’t know which platform we are on and which of the ReferralCardForUser implementations to use.
We need a way of detecting our platform and automatically choosing the right implementation of our widgets. To solve this problem, we created a Platform builder widget that you can read more about in our separate blog post.
Tip 4: Make switching platforms simple
Over time we have learned that if one platform is harder to run than another, it will get less love and be potentially more buggy. Using Flutter with VSCode has made it really easy to switch between platforms and test drive all of our apps.
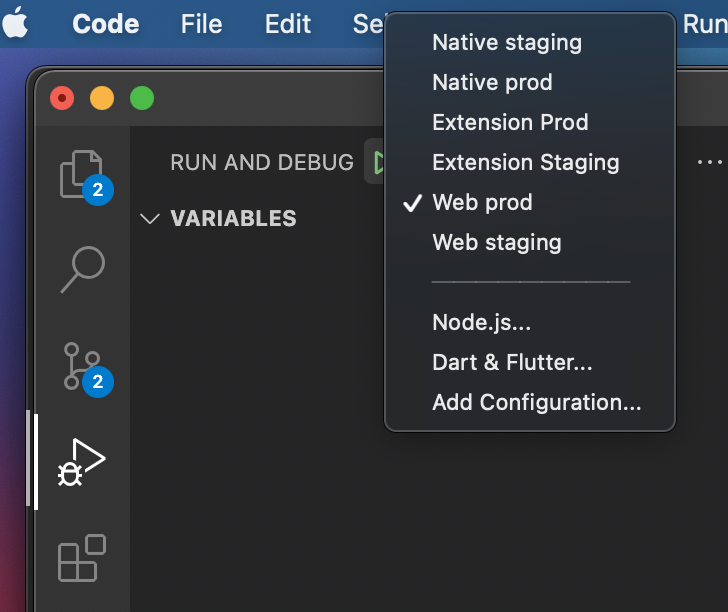
One helpful tip for quickly switching between platforms is to setup a launch.json file. The launch file lets you define a set of run configurations that you can toggle between when starting your app:
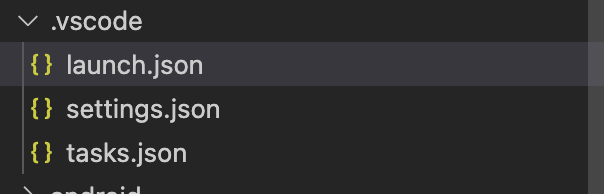
The file goes in the .vscode folder of your project as shown below:
Here are a few of our launch configurations for different platforms:
{
  "version": "0.2.0",
  "configurations": [
    ...
    {
        "name": "Native prod",
        "type": "dart",
        "request": "launch",
        "program": "lib/main.dart",
        "args": [
            "--flavor",
            "prod",
            "--dart-define",
            "ENV=prod"
        ],
    },
    {
        "name": "Extension Prod",
        "preLaunchTask": "prepare prod extension",
        "type": "dart",
        "request": "launch",
        "program": "lib/main.dart",
        "args": [
            "-d",
            "chrome",
            "--web-port",
            "8081",
            "--dart-define",
            "ENV=prod",
            "--dart-define",
            "PLATFORM_OVERRIDE=chrome-extension",
            "--web-renderer",
            "html"
        ]
    },
    {
        "name": "Web prod",
        "preLaunchTask": "prepare prod web",
        "type": "dart",
        "request": "launch",
        "program": "lib/main.dart",
        "args": [
            "--dart-define",
            "ENV=prod",
            "--web-port",
            "8081",
        ]
    },
  ],
  ...
}
To start a Flutter app, you need to run the lib/main.dart file with your config arguments. For us, that means specifying the flavor (staging or prod) and some additional flags like the web renderer to use. This is a small thing that makes switching between your apps a breeze.
All for now
That’s all we have for now, hopefully you’ve found some of our learnings on what has worked well for us when building cross platform Flutter apps helpful. If you would like to chat more about building across platforms with Flutter, feel free to reach out on Twitter or at team@pollyn.app.
As we continue to learn new things about Flutter and building these apps we will share out more of our reflections so stay tuned and happy coding!